Some of my clients or fellow photographers often ask me “How did you take that picture of the bride in the window?”. I thought it would be fun to share my journey creating this award winning portrait with all of you.
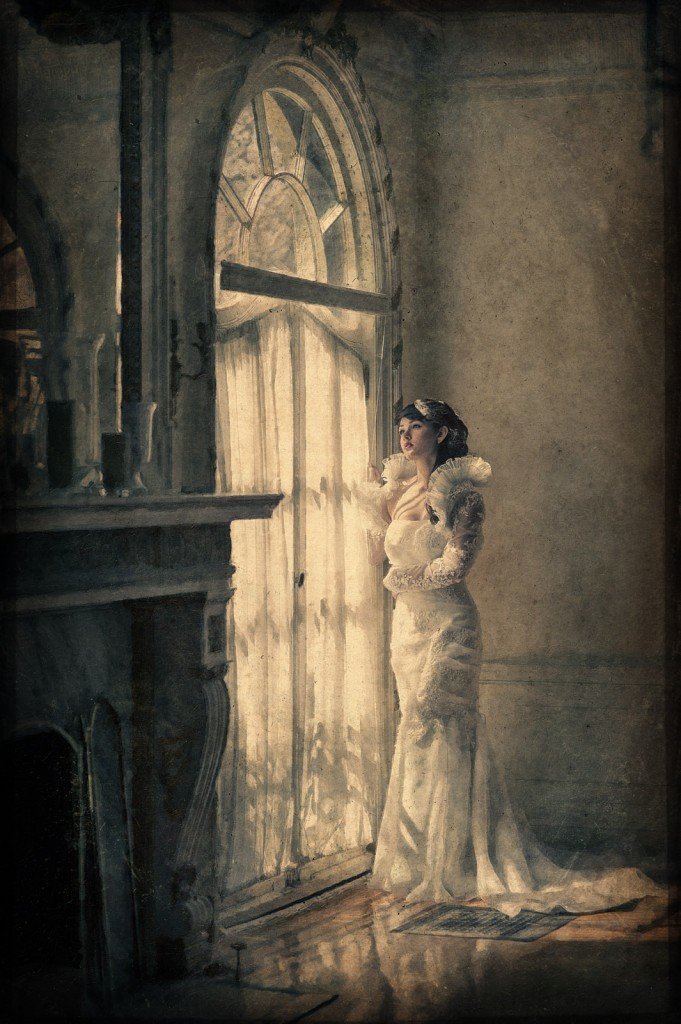
This mansion gets beautiful light almost all day. I positioned her beside the window leaving the smaller curtain closed to diffuse the light on her.
How did you take this picture? This portrait was taken late morning in March. I used my Nikon D3s with my 85mm using only available light. My first step with all my portraits is determining my camera settings and my composition. In the last year, I’ve fallen in love with my 85mm for portraits of clients. There’s no distortion with this lens, which is a common complaint when using a 50mm for a portrait. There’s something dreamy about it so I use it when I’m not shooting with my 24-70mm. With this portrait, I selected my f stop first. I chose f 2.8 because I wanted my client to be the center of focus. I had my ISO at 400 and the shutter at 1000 gave me the proper exposure. The sun was streaming through the window on the left side of the photo. There was also a front window on the right of the photo which illuminated the brides gown ever so subtly.
How did you come up with this concept? This was my first time shooting in the mansion built in the early 1900s. It has rich history, ornate detail and six fireplaces in the 12,000 square foot space. The concept for this shoot was simple. I wanted to take beautiful portraits of my client in this historic mansion. Her gown, her styling and everything channeled this era and I couldn’t think of a more perfect venue than Casa Belvedere. On the wedding day, we don’t always have an extra hour or two for bridal portraits. The timeline is often constrained so having this time, gave me the opportunity for additional portraits of this beautiful girl. One important aspect of my style is to convey the clients accurately. If I have a serious client, I won’t photograph them jumping in the air. If I have a youthful client, I won’t photograph them too serious and out of character. I want their portraits to be real reflections of who they are.
How did you execute this concept? After getting my camera settings and composition, I positioned her beside the window. There were a few areas in the mansion that I considered for a formal portrait. I loved this window because of the beautiful light. I do look at every little detail when executing my concept. Besides finding beautiful light, my second priority was finding a beautiful background.
How did you compose this portrait and pose the bride? I positioned her beside the window. Initially, I moved her closer to the right side of the window, but found if she stood along the outside edge of the window it just felt right. I don’t always nail it on the first shot. I’m not going to pretend I do. I photographed her closer to the right panel then asked her to step back 2 inches, then back another inch. Very small movements. I didn’t want a static image so I asked her to put her hand tightly around her waist and very slowly run her hand across the front of her belly and then back again. Adding some movement can keep your clients comfortable and less stiff. When I ask my clients to move for me. I ask them to slow dance and count in their head 1, 2, 3…1, 2, 3. Go ahead say that in your head 1, 2, 3… 1, 2, 3. This creates slower more deliberate movements that are rhythmic and not sudden and sharp. I can’t tell you how often I’ve asked someone to move their hand slightly and they moved it 5 feet out of the frame. When I composed this portait, I selected this window instead of the other window because of the direction and quality of light. The suns position added more interest to my portrait by creating beautiful highlights on her gown. I was careful to move her face out of the direct sun. There’s a strong highlight on her head but it doesn’t bother me much. I think the diagonal shadows across her chest are interesting. I asked her to bend her knee closest to me. This created a nice s-curve in her figure. The fireplace mantal cuts into the window pane. I don’t mind it since the line leads into my subject. Also, the curve in the window leads downward into my subject. I look at every little detail when executing my concept.
Background: This portrait entitled “Her Last Single Moment” won 2nd place in an international competition in September 2011 for WPPI. The feedback given by the judges stated “Great pose and expression. Style of a Singer Sargent painting @1900’s”. Also, this image was published in the prestigious PPA’s Loan Collection book this year. The Loan Collection is a presentation of photographic images judged by the PPA as examples of excellence. It was also published in Octobers editions of Rangefinder Magazine.
There’s one funny comment I’d like to make. When I read the judges note “Style of a Singer Sargent painting @ 1900’s”, I’ll be honest and admit that I immediately googled “Singer Sargent painting“. I know some of you may laugh, gasp or google it too. I don’t have an art history background. Some days I wish I did, but working in finance with and BA from NYU has served me well in building a solid revenue generating photography business. I will say that I feel very honored and grateful that comment was noted (except that whole scandal in 1884). The interesting fact about Singer that stood out beyond his acclaim was that he commanded $5,000 per portrait or $130,000 in current dollars. Holy cow that’s amazing. Outrageous, maybe? I don’t know. Talk about revamping my 2012 goals. Maybe a 2014 goal?
Why did my clients like it? More importantly, why did I love it? My current and prospective clients love this image because it’s elegant and beautiful. I had a bridal consultation just the other day where the bride mentioned how much she loved this image. I personally love it because it was taken 8 months ago, but it looks like it could have been taken 80 years ago. It’s one of my greatest photographic accomplishments, that was 2 years in the making. It represents a culmination of all that I’ve learned from so many master’s of photography, yet its my own unique style (although it may resemble Singer Sargent to some people).
How many hours of time was investing in this image? My estimation is 8 hours was invested in creating this image. 2 hours during the consultation and preparation, 1 hour on the execution and at least 4-5 hours processing and editing this photo.
STAY TUNED for more articles on “How did you take that picture?”. If you enjoyed reading this article and are curious how I took any specific pictures, just email me at natalie@natalielicini.com.
Wishing everyone a very Happy New Year!
Natalie

